The problem
It’s fairly straightforward: You have a site (let’s say local.mse.com) on your machine and you want to access it from another device on your network (in my case, mobile devices).
The solution
There are several ways to solve this, but I’m convinced this is the easiest one (if you have a better option please comment below).
Basically it all comes down to having the client devices resolve the local.mse.com domain to you computer’s IP. If you’re dealing with computers, then you can just change their hosts files, but that’s not so easy when you want to use mobile devices to test.
What you need
All you need to know your network IP (I’m going to assume it’s 192.168.1.144 because that’s mine). You may want to have your DHCP server assign always the same IP to your machine to make the whole setup persistent, but that’s not required.
If you have a router with DNSMasq and you have admin access to it, then that’s all you need. If you don’t, I’m going to show how easy it is to use docker to run DNSMasq on your Windows machine.
What to have to do
- Ensure that your Windows firewall accepts incoming connections on the 80/443 ports on the
192.168.1.144interface. - Ensure that the sites you want to share on IIS have a binding for the
192.168.1.144IP.
If you have a router with DNSMasq
- On your router, add the following
DNSMasqoptions so that when any device on your network asks forlocal.mse.com, your router replies with192.168.1.144(I’m adding a couple more, the ones I use at my cool job!)
address=/local.mse.com/192.168.1.144
address=/local.sstatic.net/192.168.1.144
address=/local.talent.stackoverflow.com/192.168.1.144
This is how it looks on mine:
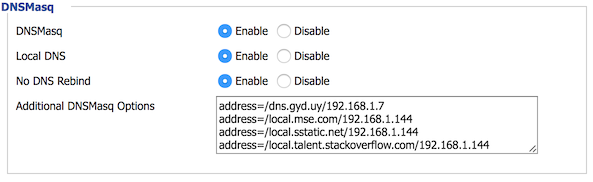
What this change does is telling your router to resolve local.mse.com to your IP, so when a device on your network asks for local.mse.com, your router replies with 192.168.1.144 regardless on what’s on the real mse.com zone.
If you don’t have a router with DNSMasq
You could use any DNS server (and you could skip the docker setup) but IMO nothing beats DNSMasq’s simplicity even if it’s running as a docker container.
- Install docker
- Ensure that your Windows firewall accepts incoming connections on the 53/tcp and 53/udp ports on the
192.168.1.144interface. - Run my image (forked from andyshinn/dnsmasq) starting
DNSMasqon a docker containerrun -p 53:53/tcp -p 53:53/udp --cap-add=NET_ADMIN g3rv4/dnsmasq --address=/local.mse.com/192.168.1.144 --address=/local.sstatic.net/192.168.1.144 --address=/local.talent.stackoverflow.com/192.168.1.144 - On the devices you want to use to test, set the DNS to
192.168.1.144
Profit!
And that’s it! now every device (or the devices you set up, if you followed the docker route) on your network can access to local.mse.com and it will be handled by your computer.